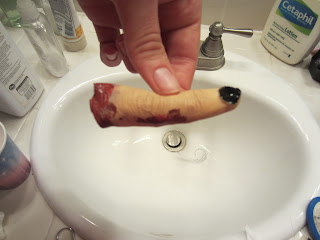
It's nearing Halloween, my favorite holiday, so I decided to make some fake severed fingers. The video I watched is here.
The detail on the finger is great.
You start off my putting baby powder on one of your fingers (so liquid latex won't stick to it) then cover it with a nice thick layer of liquid latex.
And you're done! I didn't time myself, but I think it probably took 20 minutes or so. I had all the materials on hand, so it was FREE! Using some eye shadow or blush might give the finger a little more dimension, too.
The detail on the finger is great.
You start off my putting baby powder on one of your fingers (so liquid latex won't stick to it) then cover it with a nice thick layer of liquid latex.
It goeson white, but dries clear-ish. Blow dry this on the cold setting. Put 2-4 more layers of liquid latex on top (3-5 total), thoroughly drying between each layer. I used 3 thick coats and it was enough.
Then start to peel the latex off. Make sure to constantly be brushing baby powder inside and outside the latex as you go so it doesn't stick to itself.
The latex picks up all the details and wrinkles from your own finger, making it look realistic. The wrinles are all inverted, so they stick up rather than being indented, but without close inspection nobody will notice.
In the video she painted the finger with alcohol-based paint which is a really long lasting and expensive body pait. I don't have any, so I just rubbed some foundation on it.
To make the foundation stick better, I finished it off with a few sprays of green marble, which is a setting spray that puts a thin film barrier between the surface and the fingers touching it.
After it was colored, I painted the nail black, and stuffed it with toiled paper. Stuffing it with cotton balls might work better or be more even, but I didn't have any.
After stuffing it, I used a burgundy colored acrylic paint as the blood. Using fake blood might look more realistic, but I didn't have any.


No comments:
Post a Comment