Thursday, August 20, 2015

Computer Desk

I am living with David at my mom's house until we can afford to move out. For the time being we want a computer desk, but we needed it to be REALLY cheap and something that fit into the space we needed. We decided to make our own.

This is the little nook we wanted to put the desk in:


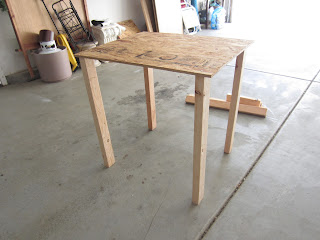
We went to Home Depot and bought two 2" x 3" boards that are 8 ft long. The home depot guys cut them into 28" sections for us and these became the legs. We also bought a 2' x 4' strandboard and they cut it into a 24" x 29" piece for us. We screwed the legs to the strandboard using 2 screws for each leg. If you drill a small hole into the wood before screwing it in, then screwing is infinitely easier. That's it! It cost us about $10.


The strandboard. You can see two screws at each corner holding the legs in position.

2x3 boards. These are the extras that didn't get used.

The finished desk.


We used the extra wood to prop up the monitor.

Wednesday, August 5, 2015

Embroidery Hoops

I have my thesis defense scheduled, so for two weeks I am not going to school or working. This leaves me with a lot of free time. In the last two days I have made four new embroidery hoops. Embroidery is a lot faster than cross stitch, so it's really easy to just whip out a bunch of them.

The first one I did is a 9" hoop that a friend of mine put on Etsy. It has since been sold, but I think it was going for about $45. I bought the fabric from Joanns and used 6 strands of thread that I already had. I used two layers of fabric, and hot glued the edge of the fabric to the inside of the back of the hoop.

The Original

 My Copy


The second hoop was a Harry Potter quote that I found on Pinterest. This is a 9" hoop as well, made with 4 strands of embroidery floss on one layer of fabric. After stitching, I added another layer of fabric behind the first, and hot glued all the edges to the inside of the back of the hoop.

The original

I trace the pattern on my fabric

Finished product

The extra layer of fabric covers up the stitching from the back.

The third hoop was the fastest one I made. It took me maybe half an hour, if that. I just think it is so cute and funny. This is a 3" hoop with 18 count Aida fabric. I used one strand of black embroidery floss. I found the original hoop on Etsy.

The origiinal

My copy


The last hoop is another Harry Potter one from Etsy and was selling for $38. I used fabric I already had with 6 strands of embroidery floss, and I purshased the felt from Joanns. I stitched this on two layers of fabric. The hoop is 7".

The Original

Pattern

Finished product


The four hoops I finished yesterday and today:


I love them all. 

Wednesday, June 17, 2015

Harry Potter Cross Stitch

I found the cutest little Harry potter cross stitch on Pinterest, and I was lucky enough to find the completed version and the digital version.


These are the colors I used and their DMC numbers:


Skin: 437
Wands/shoes: brown (on hand, no DMC number)
Dumbledore's clothes: 3835 and 3743
Bottom part of Dumbledore's hat, tassle, and Hermione's hair: 781
Dumbledore's beard: 762
Ron's hair: 720
Ron's shirt and Dobby's shirt: 414
Harry/Hermione's shirts an Voldemort's head and Hagrids belt buckle: 415
Snape's cape and Voldemorts clothes/ Harry, Ron, and Hermione's pants: 413
Snape's Shirt: 823
Hagrid's hair and Dobby's shoes: 938
Harry's scar, words "Harry Potter", and maroon color on gryffindor scarves: Marroon (on hand, no DMC number)
Lighning bolt and yellow color on gryffindor scarves: (on hand, no DMC number)

I used 3 strands of embroidery floss for everything, 2 strands for Harry's scar, and 1 strand for the outline of Harry's glasses


Here is the setup, the cross stitch on my lap, with the pinterest picture in front of me.


I started with the outline, then the skin, and whatever struck my fancy after that.

I thought I was done, but I forgot Harry's scar!


 Finished!! So cute. Now to buy a frame. 

The finished product is approximately 4" x 5". 

And here is all the scrap floss.


Monday, June 15, 2015

Christmas Ornament Cross Stitch

My mother-in-law's Christmas tree is covered in homemade ornaments and she really wanted me to make one to go on it. She knows I cross stitch, so I went on Etsy in search of a Christmas themed 3" hoop I could copy. I narrowed in down to 3-4 designs, then let my mother-in-law pick her favorite. 

I started by finding the center of the 14 squares/inch Aida fabric.


I already had light blue embroidery floss on hand, so I began with the top left corner of the snowflake. And then I ran out of floss and had to go get more. I tried to match the color, but the rest of the snowflake is a slightly darker blue.


 I glued the excess fabric to the inside of the hoop so it doesn't get in the way.


And then I tied some twine around the hoop fastener for hanging purposes.


She loved it!

I love you but you don't know what you're talking about

I saw this cute little embroidery hoop on Etsy that perfectly describes my relationship with David (it's a quote from the movie Moonrise Kingdom). In fact, I'm pretty sure I've said this exact thing to him before.


It is a 4" hoop that someone is selling for $15. Outrageous! I could make this for free minus the cost of the hoop itself. 

So I went out and bought a 4" hoop. When I held the hoop up to my computer screen, it was obvious that the cross stitch fabric this Etsy seller used had much larger squares than the normal 14 squares/inch fabric I use. I didn't want to go out and buy more, but I happened to have accidentally bought 18 squares/inch fabric one time, and it just so happens that this is almost exactly half the size of the one the seller used. So for every one square in the original pattern, mine has four tiny squares.


 I held up the fabric to the computer screen and started with the word "I" roughly where I thought it should go.

I used pink, blue, green, and black that I already had on hand from other projects. I used two strands of embroidery floss for everything, but looking at the original, I think the seller may have used 3. 


I finished it by folding over the fabric and hot gluing it to the inside of the hoop.


I found a nice little spot for it on my wall.


Friday, June 12, 2015

Bob Ross #2

I did a step-by-step paint tutorial earlier this year (earlier post here), but it wasn't actually a Bob Ross tutorial and it really only used like two colors. Painting a Bob Ross painting was on my bucket list, so I decided to go for it again, with a more colorful pallet.

Here is the video I watched:


The supplies from Michaels (I didn't need to buy anything new, because I still had it all from last time, except the 16" x 20"canvas):


Mid painting sesh:


And the finished product!


Side note: Mountains are so much harder to paint than Bob Ross makes them seem. Also, oil paint ended up EVERYWHERE. Thank goodness it comes out with soap.