These are the sewing/crafing/special effects/cosplay projects I do. Sometimes I just want to keep track of the things I've done, but usually I like to make a tutorial so others can learn how to do them too (and learn from my mistakes).
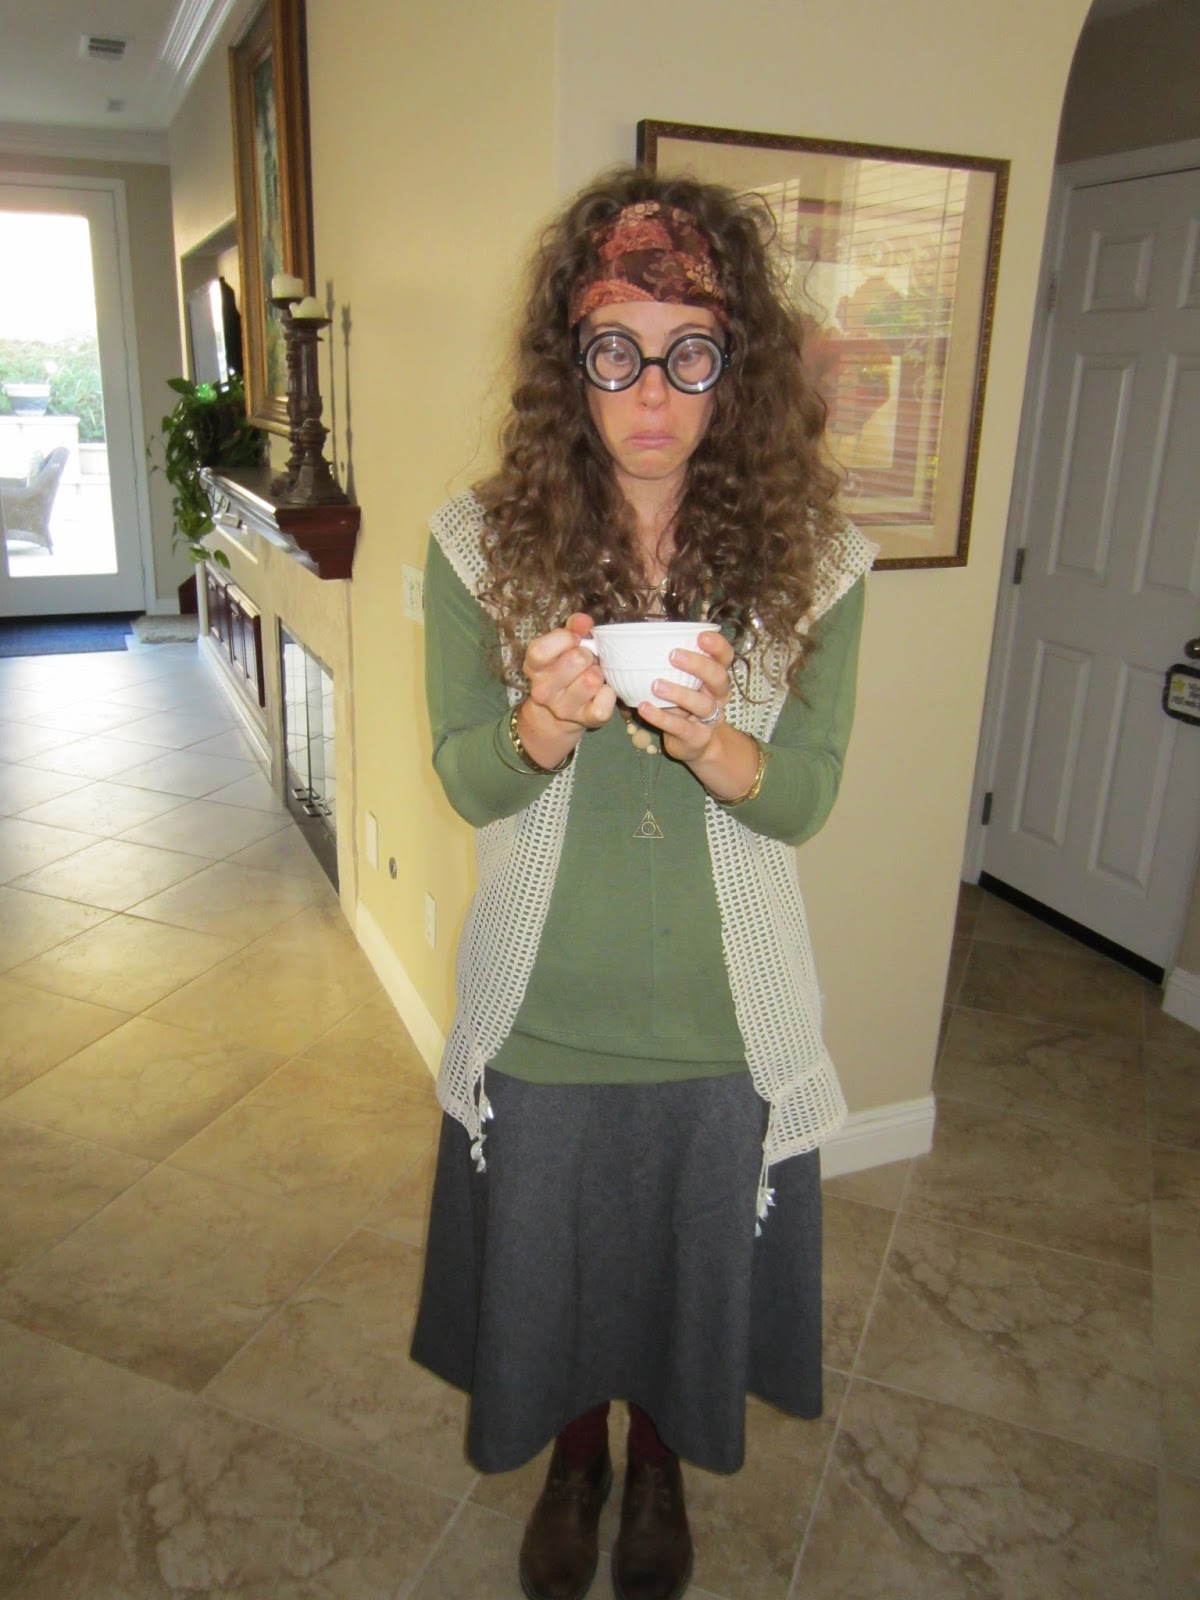
Sometimes I just get hankering to make a costume, and last week I had one of those. I chose to make a costume I've been wanting to make for a long time: Sybill Trelawney from Harry Potter. The finished look:
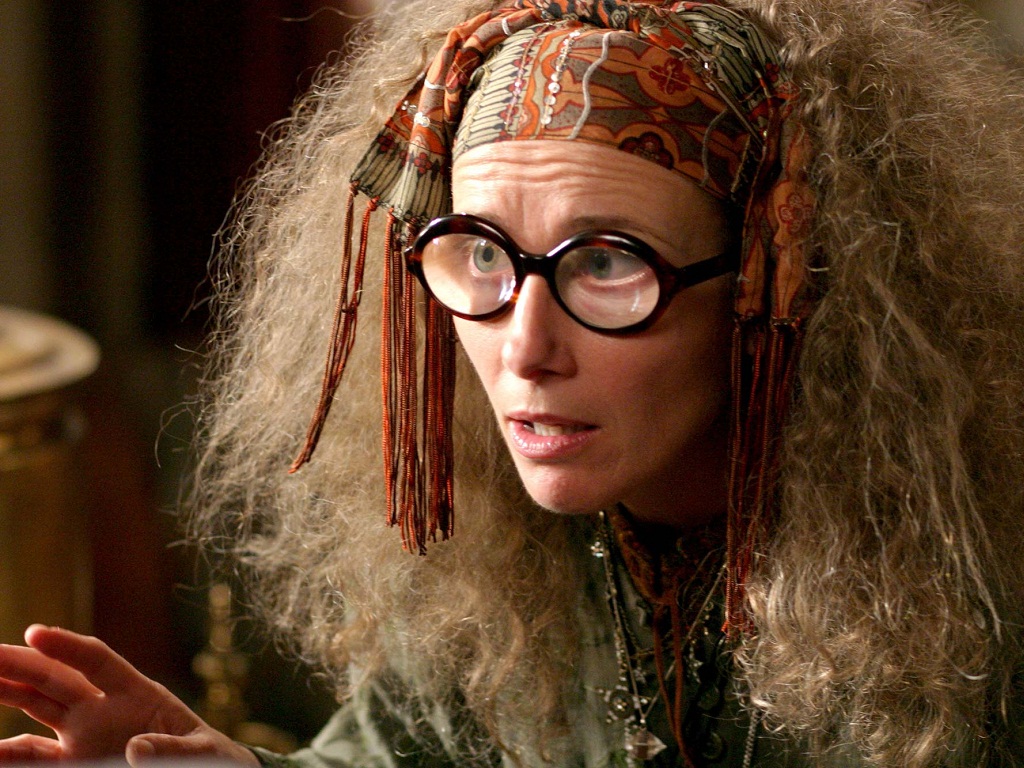
What Trelawney actually looks like:
The obvious first place to go for her cotume is a thrift store. And that's exactly where I went to get the goods. I finished the costume in about half an hour.
I started with her vest:
This over-the-shirt item for $4.
Cut in half so I can use it as a vest.
These beads dangle and make noise when I walk, which I love.
Next I made her headband:
I found this shirt for $4. It is stretchy.
I cut a strip of fabric and sewed it into a circle.
Perfect!
Thsi also came with the shirt. I didn't use it in the end.
Her skirt:
I'm a size 6-8, this skirt is size 12. It sits very low on my hips, perfect for the costume.
It had two straps around the waist that I sewed backwards.
All the jewelry I bought. Total: $6
A deathly hallows necklace I already owned.
The shirt:
I just picked something the right color that was long-ish sleeved. $5.
Socks/shoes were Clark Desert boots and some winter socks that I already owned.
For 2015 San Diego Comic-Con David went as Spike Spiegel from an Anime show called Cowboy Bebop.
This was a pretty easy/straightforward costume. I did it in one day.
We bought the yellow dress shirt and blue suit coat and slacks from a thrift store. We bought a half yard of lighter blue woven fabric from Joanns.
I started by removing one of the lapels and the collar off the jacket. I then turned in the exposed edges and sewed the open edge closed.
Spike's sigle lapel is quite large, so I cut the remaining lapel and spread it out to make it bigger.
I covered the lapel with light blue fabric, and hand sewed it down to the body of the coat so it would stay in place.
The light blue fabric only covers the outside of the lapel, and stops right at the crease.
I used 2 snaps for each strap on the jacket. The straps were hand sewn to the body of the jacket. They are just rectangles of fabric (kind of like a pillow minus the stuffing) with no reinforcement.
You can kind of see the chalk I used to mark on the coat the outline of the straps so I knew where the snaps should go.
I hemmed the coat jacket by cutting it to length, folding it over, and sewing. Very low quality.
The pants already fit him, so I was done!
I actually added some blue fabric to the rolled up cuffs of the jacket. I was sick of the project, so I just hot glued on the light blue fabric. Also, we sprayed David's hair with hair spray color dye.
For San Diego Comic-Con this year I went as Diva Plavalaguna from the Fifth Element.
Me:
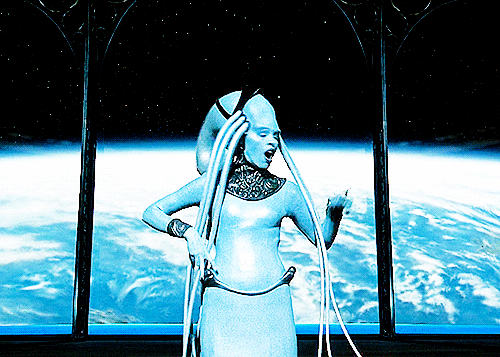
Plavalaguna:
I bought 5 yards of Venezia ITY 94% Polyester 6% Lycra Spandex Stretch 58"-60" off Ebay for $20 plush shipping. This fabric is super stretchy, super wrinkle resistant, and only a little bit sheer when stretched.
I started with the dress, and used a pattern I already had. It is NewLook 6068. I cut out the fabric from this patter (without the darts), and then put it on. It was way way too loose, so I just pinned it tighter and re-sewed the side seams. Stretchy fabric is just ridiculously forgiving, so I really just used the pattern to give me a starting point.
Then I used the same pattern for the sleeves. I took in the sleeves a lot, but similar to the body of the dress, I just kept taking it in until it fit how I wanted.
Hemming the dress was literally the last thing I did of the entire costume process because I wasn't sure what shoes I was going to wear. So at this point the dress is way too long and uneven at the bottom.
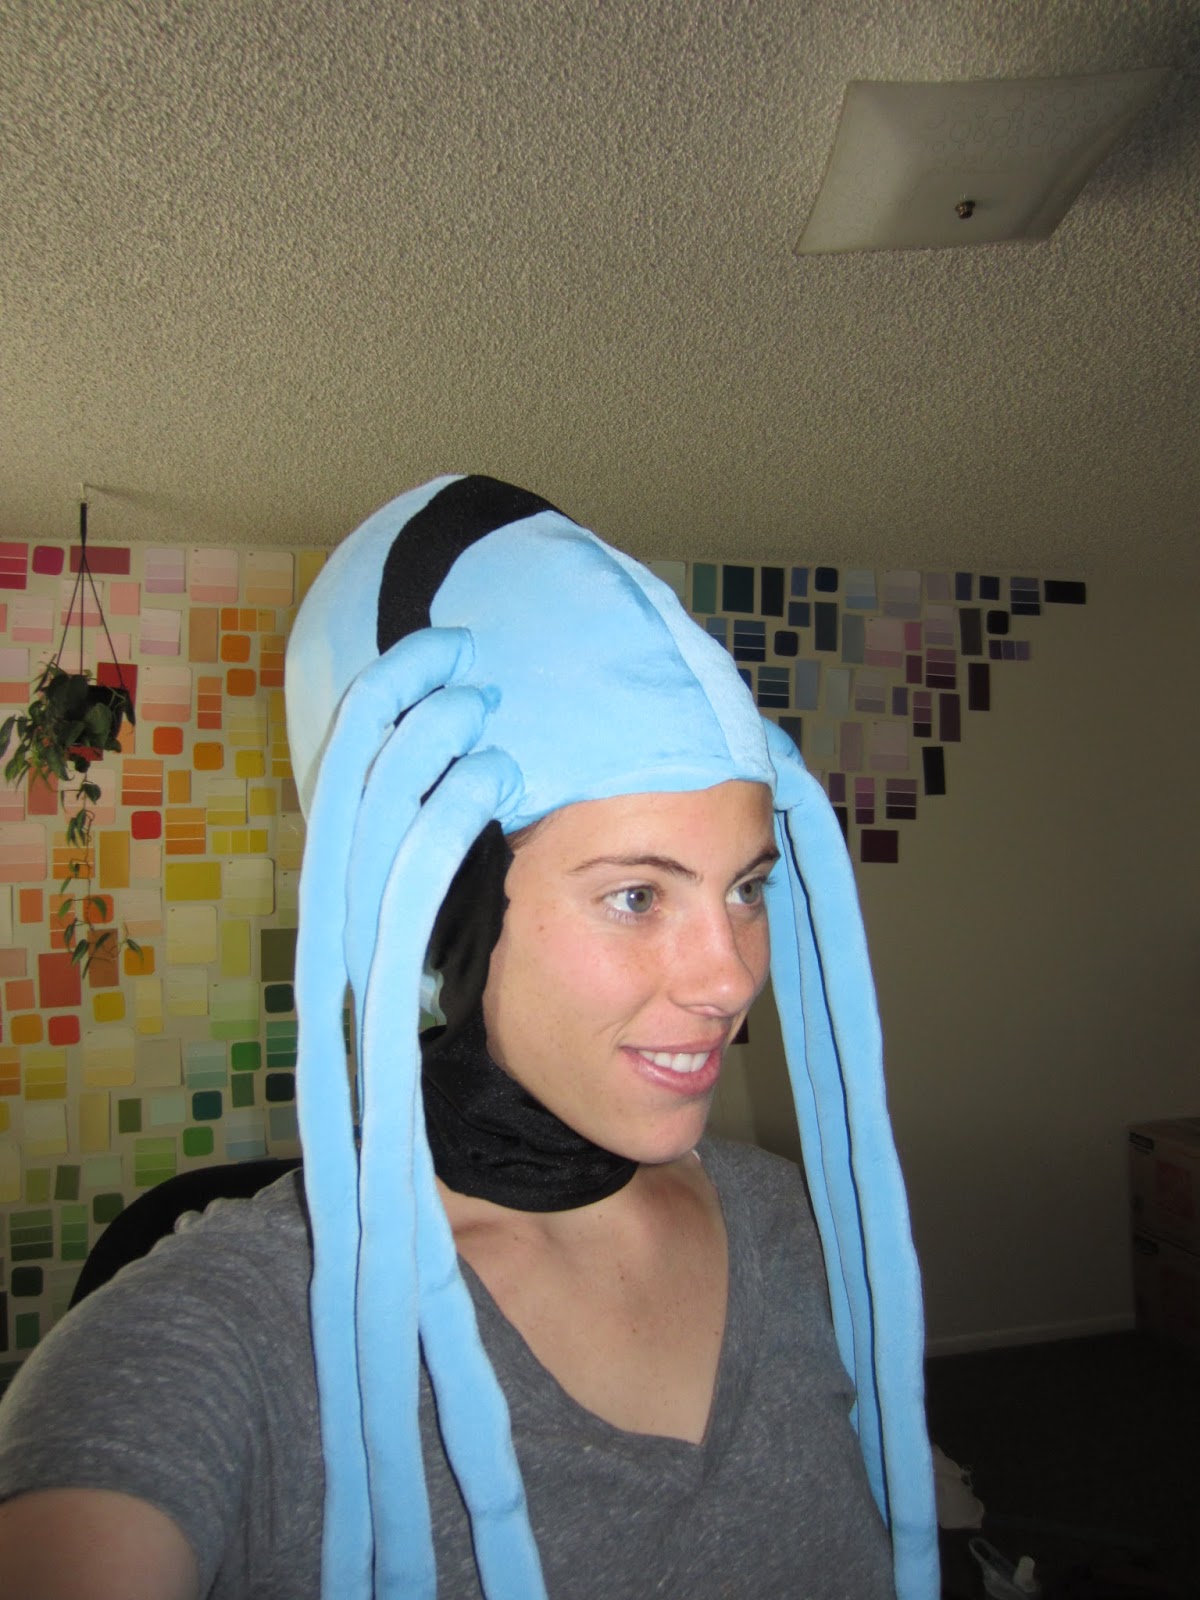
For the headpiece, I bought 2 yards of Fosshape 300 (I only used 1 yard, though, including messing up once). Fosshape looks and feels like felt, but when it is heated/steamed, it hardens. It isn't rock hard, but it holds its shape.
I started by measuring my head, then drawing the shape I would cut on the Fosshape.
I drew on the fosshape with a very light blue fabric marker then layed down next to it to make sure it was the shape I wanted. The part touching my head I drew to half the circumference of my head (because I was using two of them) plus seam allowance. Then I cut out two of these shapes and sewed them together.
I actually drew it way too big the first time and didn't realize until I tried it on my head, so I repeated the process twice. Once the fosshape is cut out, sew the two pieces together, stuff them with polyfil, and take a steamer to it to harden it up (beware! fosshape shrinks when heated!)
This was my first time using Fosshape so it was pretty lumpy and I had to make a lot of adjustments on the fly. But it turned out okay. Then I covered it in a layer of Modge Podge. I was trying to smooth out the surface, but really the Modge Podge didn't do that. It gave me a good painting surface, though. I painted the head piece with one coat of acrylic paint.
This was he original piece I cut out that was way too big.
It looked good, but I just didn't like the rough texture, so I ended up tracing it onto my extra blue fabric and cutting out another headpiece shaped piece. I used this to cover the existing painted piece. It make the whole look more cohesive. I cut the blue fabric small enough that it fit super snugly over the fosshape and the only securing I did was with hot glue right around the opening.
Putting the black around the head/neck was actually pretty tricky. I cut out a super rough cut of black spandex/swim suite fabric. The hole in the middle is for my face. I then put my face through it, pinned it around my neck, and sewed the seam up the back of the neck.
From here I started cutting away the black fabric so it was in the right shape. I would pin it in place so it wouldn't move around on me.
I used hot glue to secure all this black fabric in place.
There is one extra black piece that is just a thin strip of black fabric. I hot glued it on as well, and just cut it off where it connected to the larger black piece.
From here I started making the tentacles that attach to her head and back (12 total). I cut long strips of fabric about 2.5" wide, then sewed them into long tubes with about 1/4" seam allowance. To bottom of the tube is just sewn straight across.
I turned them inside out using a mop handle, and I stuffed them with polyfil the same way. I would stuff a bunch of polyfil into the opening of the tube, the shove it down using the mop handle. It would end up as a really compressed round ball of polyfil at the bottom, and then I'd spend 10 minutes mooshing it around and trying to spread it out within the tube. It ends up very lumpy, but overall it looks fine.
For me, it took maybe 3-4 clumps of polyfil to fill the entire tube. I wasn't stuffing them very full because I wanted them to be floppy.
I would then hand sew the open side closed once it was cut to me desired length. Because I made them so floppy, they weren't stiff enough to stick away from the headpiece once attached. Before I sewed the tube closed, I shoved in some extra polyfil at the 2-3 inches closest to the opening. This just gave it a little bit of stiffness right there.
To attach these to the headpiece I hot glued them. I tried to really press the hot glue into the fabric of the head piece so it would seep through and touch the fosshape underneath. This helped the weight of the tentacles to not pull the blue fabric away from the fosshape. After hot gluing, I hand sewed the tentacles on, just because I don't trust hot glue to hold any weight.
After the tentacle were glued on I glued small strips of black fabric around the bases of them. This covered up the hand stitching an the hot glue. Also, the neck piece wasn't long enough, so I added some more black fabric to the bottom of it. (Sorry, no pictures of this.)
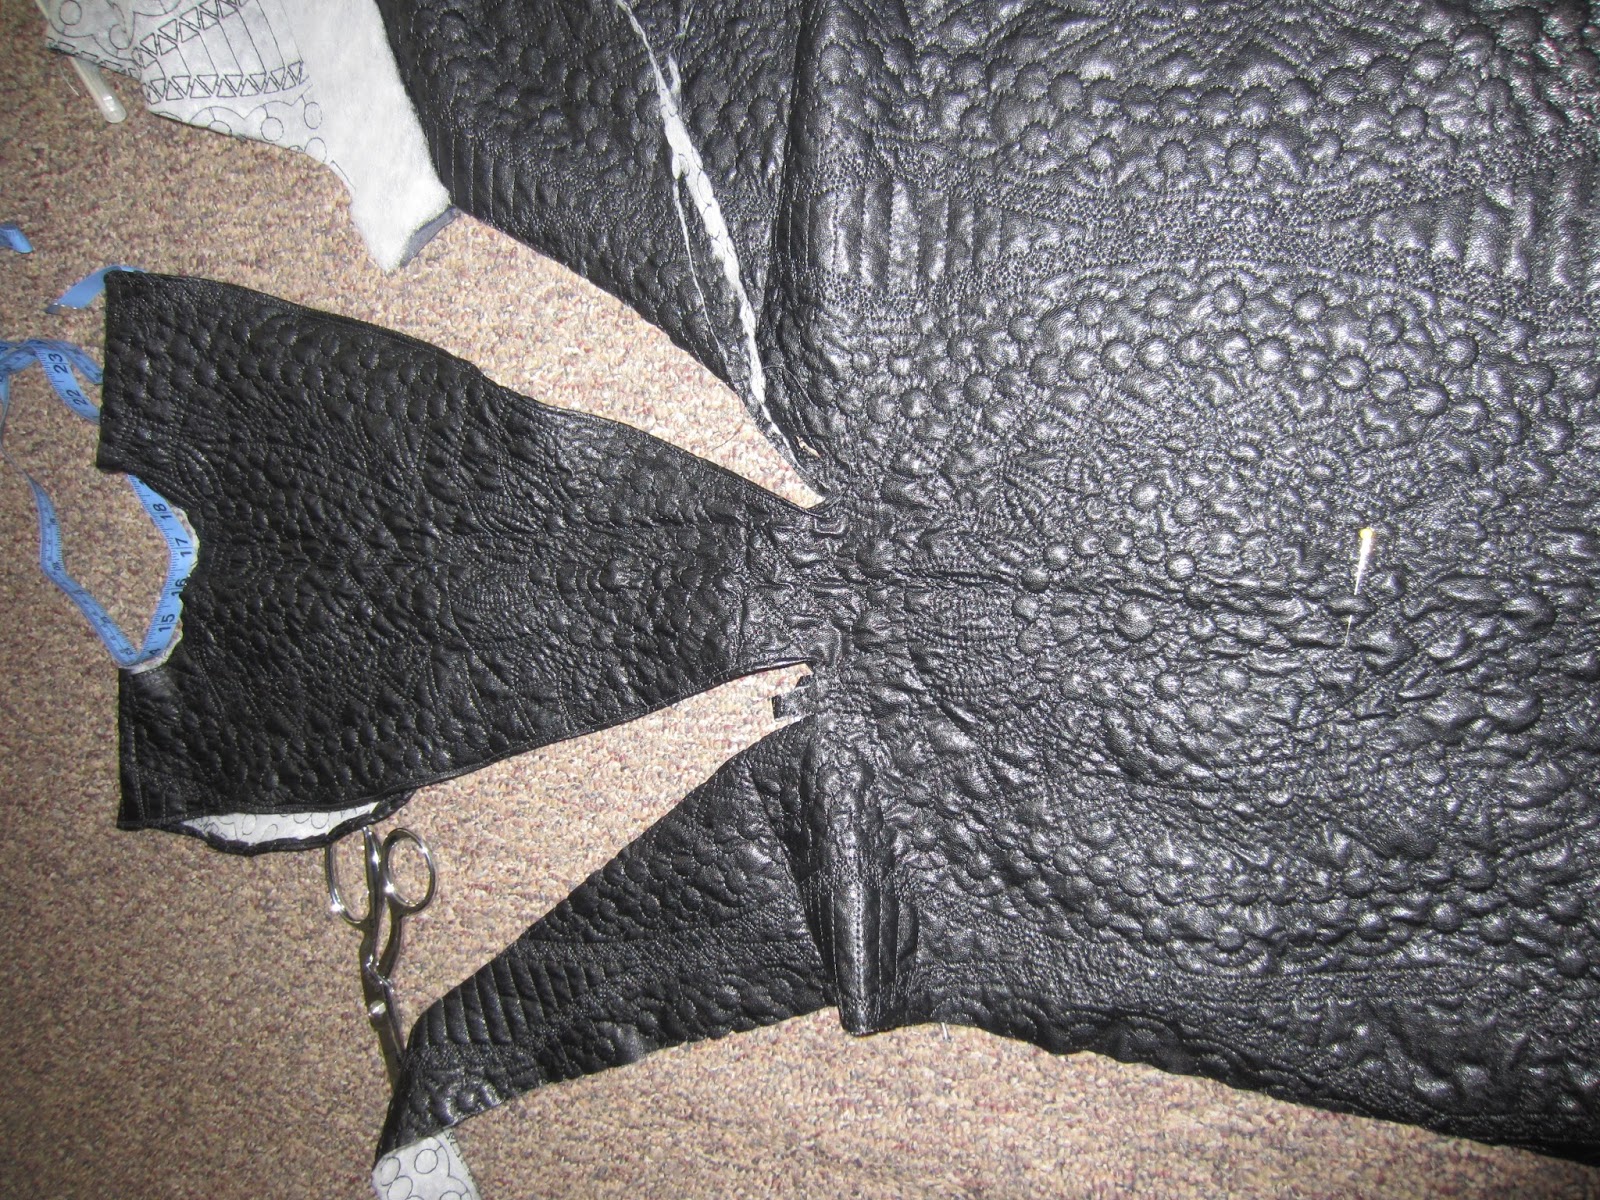
Next I started on the neck/back piece. It is black and textured, and I was able to find a black quilted fabric at JoAnns that worked perfectly. I got the bare minimum amount of fabric (I think it was half a yard or something), so I didn't want to waste any. I found the center-ish of the quilted pattern and cut out a round shape that would sit on my chest and a hole for my head to fit through.
I kept the rest of the fabric attached, so half a yard of fabric is hanging off my back in this picture.
Once I liked the shape of it, I started cutting out the shape of the back piece.
You can see the quilted texture here.
This is the part that wraps around my hips to the sides.
After it was all cut out I finished the edges by turning them over 1/4". I attached this to the dress by hand sewing it on with black fabric. I don't have a dress form (wish I did!) so my poor husband had to help me out. And I made him wear a bra so the fabric stretched in all the right places when I wore it. He got so mad when I took pictures of him hahaha.
It stopped right at my sides.
The 3D portion of the back piece I made out of a piece of foam meant for a seat cushion. I cut it using a sharpened butcher knife and steak knife. I ended up making two of these pieces because I covered the first one in black fabric and hated how it looked. The second one I just spray painted black, and it looked much better.
I just winged the shape of it based on the picture up above of Plavalaguna from the back. I had to make sure it would fit inside the shape of the black fabric I used for the neck/back piece too.
It was a messy process.
For the piece I ended up throwing out, I covered it the same stretch fabric I used on the headpiece. I hot glued it to the foam, but the hot glue ended up showing through and there were tons of wrinkles and creases that just made me unhappy.
Not a fan.
Try #2. I spray painted it black.
Foam isn't the best for sewing, so I hot glued some of the black knit fabric to the back of this foam piece, and hand sewed that onto the black fabric that was already sewn on to the dress.
Using that same cushion foam, I cut out two ovals that I would slap on my hips right where the black quilted fabric ended. I covered them with the black spandex fabric using hot glue, then hot glued and hand sewed them onto the hips of the dress.
I don't have any pictures of finishing the dress, but I sewed one of the blue tentacles across my waist attaching to the two black ovals (but not sewn the the blue part of the dress), and hot glued/hand sewed six more tentacles to the back piece.
Last thing was the wrist cuffs. I used some scraps from the black quilted fabric to cut out rectangles, finished the edges by folding over 1/4" and sewing, and then added 2 snaps to each cuff so I could snap them closed.
This was my first costume in my adult life that had face makeup, so when I wore this to Comic-Con I was not prepared.
I wasn't prepared for how long face painting would take. I didn't realize that water-based paint rubs off on EVERYTHING unless you put a sealer on it. I didn't realize that without excessive makeup and contouring it photographs really flat and plain. I didn't realize how to paint smoothly. I didn't realize that using eyeliner as lipstick was an awful idea. And I didn't realize how uncomfortable the paint would be. Here is a picture from the actual convention.
I mixed blue and white paint, and by the end of the day it just looked white and it had flaked off and I felt so ugly. I ended up taking the makeup off.
After the convention I did a lot more research on makeup. I still don't get how to make it not flake off, but I know a little more how to put it on smoothly, make myself look more beautiful instead of creepy, and how to put a sealer on it so it doesn't rub off quite so easily.
I bought actual navy blue lipstick off Amazon, I put on a lot of eye makeup, and I used some blue eyeshadow to contour my face.